projects - christmas advent calendar
Christmas advent calendar
you will need
- a piece of plain coloured fabric 32 x 43cm for the boots
- a piece of Christmas fabric 42 x 78cm for the base fabric
- a piece of plain fabric 37 x 69cm for backing your project
- 130cm of cotton based lace approx 12mm wide
- 2 oz wadding 38 x 72cm
- a 44cm length of doweling
- a 100cm length of cord
- Appliglues no. 6 clear, no. 32 soft gold and extra Appliglues of your choice for the designs on the boots
- ribbons, sequin and/or pearls for decoration
- refer to 'appliglue instructions'
method
- wash and iron all the fabrics
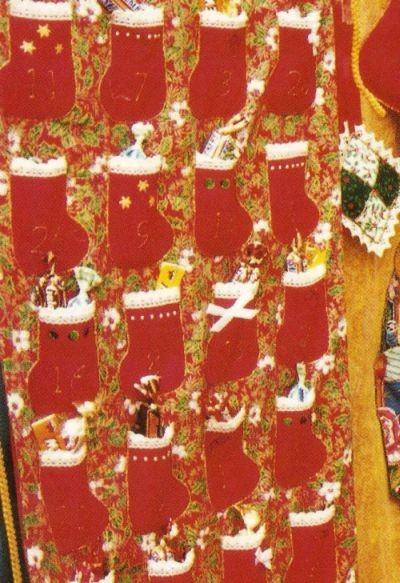
- cut out 24 boots (12 with the toe pointing left and 12 with the toe pointing right)
- turn under a 2cm hem along the long sides of your patterned base fabric and a 2cm hem along one of the short sides and then turn under a 4cm hem on the remaining short side. Press the sides with an iron. The edge with the deeper turning will be the top of your advent calendar and you will thread the doweling rod through this hem so that you can hang it up using the cord.
- put all the boots onto the stiff card with the right sides up. Remember 12 boots will point to the right and 12 will point to the left.
- using Appliglue no. 32 soft gold number the boots 1 to 24 (as shown below). Practice first writing the numbers with the glue on a piece of scrap fabric.
- to apply the lace to the top of each boot, run a little of the clear appliglue along the front top edge of each boot and stick the straight edge of a piece of lace, which has been cut to the same width as the top of the boot, into the glue.
- you can decorate the boots further with small ribbons, beads or sequins or by making your own bead shapes or patterns with other appliglue colours.
- leave the boots to dry for 4-6 hours
- secure the colourful base fabric to the stiff board with masking tape. The short side with the deeper hem is the top.
- position the rows of boots onto your base fabric. The top row of boots should be 4.5cm from the top.
- before starting to glue the boots in position, carefully read the appliglue instructions
- starting with the top row, glue each boot onto the base fabric by scratching a thin line of the clear glue just inside the underneath edge of each boot. Do not apply the glue to the top edges of the boots with the lace as these will be left open to create little pockets.
- when all the boots are in position, starting from the top row, use the soft gold around all the exposed edges of the boots. Do not glue along the top of the lace edge.
- leave your project to dry for 4-6 hours.
- turn your project over and tuck the sheet of wadding under the turned hems.
- scratch a little clear glue along the underneath edge of the hems and press the hems lightly into the wadding to hold it in place. The top hem should be turned over last so that it is over the side hems. Do not glue the sides of this hem as you will need to leave it clear for the doweling to pass through.
- use the large piece of plain fabric as a backing to cover the wadding and to hide the raw edges of your hems. Scratch a little clear glue along the underneath edge of the backing fabric and stick this to the back of your advent calendar.
- go around the exposed edges of your backing fabric with the soft gold. Leave to dry for 4-6 hours.
- put the doweling through the slot created by the top turning and use the cord for hanging up the advent calendar. Fill the pockets with little gifts and/or sweets.
hints & tips
- to make sure all the numbers on the boots are the same size, first draw the numbers on plain paper and then trace them onto the boots using carbon paper.
- practice each template on scrap fabric before working on your project
- using appliglue you could create another appliqué design on the plain backing fabric before you secure it to the back of your advent calendar. You can then turn the calendar over on Christmas Day and enjoy a new design until Twelfth Night.


