projects - alphabet frieze
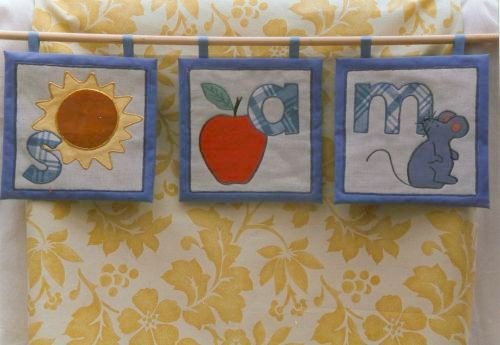
appliquéd alphabet frieze
you will need
1. A piece of plain fabric 22cm x 22cm for the main body of the square
2. A piece of plain fabric 16cm x 16cm for the base of the appliquéd design
3. A contrasting piece of fabric for the letters and the appliqué designs
4. A piece of wadding 19cm x 19cm
5. Appliglues no 6 clear and colours to match your fabrics
6. Two 10cm lengths of 1cm wide ribbon
method
1. Cut out the paper letter and make a paper pattern of the picture you are using to go with it.
2. Pin the paper patterns to the right sides of your chosen pieces of fabric and cut out
3. Secure the 22cm square of fabric, right side up, on to the stiff board with masking tape.
4. Position the 16cm square of plain fabric in the middle of this square, leaving a 3cm border all the way around.
5. Scratch a thin line of the clear glue along the underneath edge of the 16cm square to secure it to the larger square.
6. Position the letter and your chosen picture design onto the 16cm square.
7. Starting from the top, glue each piece in place by scratching a thin line of the clear glue along the underneath edge of each piece.
8. When all the pieces are in position, starting from the top, apply the coloured appliglue around all the exposed edges of the letter and design as well as the sides of the 16cm square.
9. Leave your project to dry for 4-6 hours.
10. Turn your project over and turn a 1.5 cm hem (wrong sides together) all round. Mitre the corners. Lightly press the edges on the reverse.
11. Tuck the square of wadding under the turned hems.
12. Scratch a little clear glue along the underneath edges of the hems and press the hems lightly into the wadding to hold it in place.
13. Make two loops from the ribbon and used the clear glue to secure these on the back of the square 3cms in from the top corners. Make sure the loops are exactly the same length otherwise the square will not hang straight.
14. Use the 18cm square of fabric as a backing to cover the wadding and to hide the raw edges of the hem. Scratch a little clear glue along the underneath edge of the backing fabric and stick it to the back of the project.
15. Apply a coloured glue around all the raw edges of the backing fabric.
16. Leave to dry for 4-6 hours.
17. Repeat 1-18 to make the other lettered squares.
18. When all the squares are dry, they can be hung together on a piece of dowelling to create a frieze.
hints and tips
- You could appliqué a different design onto the fabric used to back the square before it is stuck to the back of your project. The frieze can then be reversed when you feel like a change of scenery!
![]()


