projects - 3D flowers
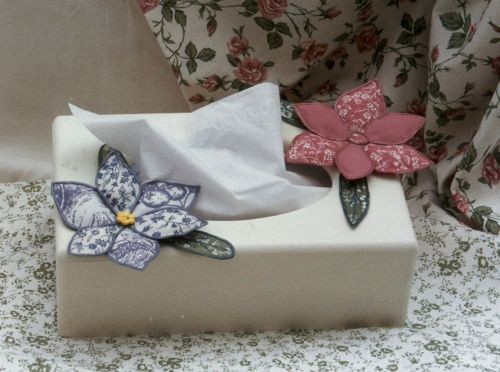
3 dimensional flowers
![]()
you will need
1. Small pieces of fabric for the petals and leaves. The amount of fabric required will depend upon the shape of your petals and leaves and the number you are going to use for each flower.
2. Fabrics to use as a backing for each petal and leaf in the same colour or a contrasting colour.
3. Stuffing or cotton wool.
4. Appliglues no. 6 clear and colours to match your fabrics.
method
1. Cut out petal shapes from your fabric
2. Secure the base fabric for the petals with the wrong side up onto the card with masking tape.
3. Position the petal shapes onto the backing fabric so that there is a space of approximately 1cm between each petal. It does not matter where you position the petals as they will be cut out of the fabric later on.
4. Start working from the top and working towards yourself, glue each petal onto the backing fabric by placing a thin line of the clear glue along the underneath edge of each petal. Do not glue right round the petals, but leave the ends which will e at the centre of the flower open (see below) and unglued. The stuffing can then be put into the petals from these open ends.

5. Apply the coloured Appliglue around all the exposed edges of the petals except where you have left an opening.
6. Leave the petals to dry for 4-6 hours.
7. Draw a circle, the same size as a 2p piece, for each flower you are making. This is on the right side of the same fabric you have used for backing the petals
8. Scratch the coloured glue around this marked circle and leave it to dry for 4-6 hours.
9. Repeat the process from 2-8 to make the leaves. However, as the leaves are not padded, you do not need to leave an opening. Use Appliglue to mark the veins on the leaves.
10. Cut around the glued edges of the petals, leaves and the circle.
11. Carefully push a little stuffing or cotton wool into each petal using a thin blunt instrument.
12. Close the opening of each petal by scratching a little clear glue on the underneath edge and apply the coloured glue to the exposed raw edges.
13. Leave the petals to dry for a further 4-6 hours before trimming away the surplus fabric around the edge of each petal.
14. Arrange the petals and leaves onto the circle you have made from the backing fabric to create a flower. Use the clear glue to secure these in place.
15. Stick a button into the centre of the flower with the clear glue or make a smaller fabric circle edged with the coloured glue which can be stuck in the centre of your flower.
16. The finished flower can then be stuck with clear glue onto a tissue box holder, lampshade etc.
hints and tips
- mix and match your fabrics to make interesting flower arrangements
- create padded butterflies in wispy organza using appliglue colours
- stuff these with coloured or metallic ribbon for a stunning effect
- create a nursery mobile with animal shapes
- use pot pourri or lavender to stuff your flowers
- buttons, diamentes etc can be placed in the centre of your flowers for added pizzazz


